
The Writer user guide
From first draft
to finished piece.
A practical guide to writing, editing website drafts, and working with AI and selected team context while keeping control of your work.
Your first few minutes in Writer
Start with a draft, connect your own AI, and work on a section in Augmented mode. Review the result, then bring the parts you want back into your writing.
Illustrated with recreated Writer screens and example AI responses. The Excel-to-chart sequence previews a planned feature.
Get started
Write your article on the page. Explore ideas in frames. Bring back only the work you choose.
Writer is a local macOS writing app. Start in Write for focused drafting or Augmented for working with an AI agent beside your document. Turn on the optional Website Editor in Settings to review and edit local page drafts. You can create, edit and save documents without connecting an AI provider.
- Create or open a document using the icons at the upper left.
- Write a few paragraphs, or import a Word document.
- Connect a provider when you want AI assistance.
- Switch to Augmented, send a section to a frame, and ask for a specific improvement.
- Review the frame’s output, then explicitly send the content you want back to the editor.
- Keep writing locally or export a Word copy.
Installation
The current packaged build is for Apple Silicon Macs running macOS 13.5 or later. Check the Writer download page for the current release, version, checksum, and installation help.
- Download the Writer
.dmgfile. - Double-click it to mount the disk image.
- Quit any open copy of Writer, then copy Robynn Writer.app into your Applications folder. Choose Replace if asked.
- Eject the disk image, then launch Robynn Writer from Applications.
The app bundles its agent runtimes. You do not need to install Node, Bun, Codex or Claude Code separately. Internet access is needed for provider sign-in and online AI requests; local writing does not require it.
Updating Writer
Quit Writer after your document has saved, then copy the newer
Robynn Writer.app into Applications. If an
older Writer.app remains, move that app to the Trash or
keep it as a backup elsewhere. Open Robynn Writer from Applications and
replace any old Writer shortcut in your Dock. Your documents are stored
outside the app. Keep a backup of their folders, including hidden
.writer data.
If you used a development or unsigned alpha build, macOS may ask the signed app for permission to read an existing saved connection. See Keychain access after updating.
Create and open documents
Create a new document
- Click the new-document icon at the upper left, or press ⌘ N.
- Choose the folder and filename in the native dialog.
- Confirm, then begin writing.
Choose a location you can find again, such as a folder for the article or project. Writer saves your writing to disk automatically.
Open existing work
Click the folder icon or press ⌘ O,
then choose Choose a file. Open a Markdown, HTML or Word
document. Opening a .docx imports an editable copy; it does not
turn the Word original into a file that Writer edits in place.
Import an existing blog article
- Open the folder menu and choose Import a blog from URL.
- Enter the full public article address, including its domain, and choose Import blog.
- Wait while Writer imports the article and supported images into your local folder.
- Review the imported text, source attribution and any notices before rewriting it.
This makes a local article you can edit in Write or Augmented. Use Website mode when you want to work with a page’s design and metadata. Importing needs internet access but does not start an AI request. Pages that require sign-in or rely on scripts may not import completely.
Writer creates an editable Markdown copy in the current document folder and
stores successfully imported images in its hidden
.writer/assets
folder. Keep that folder with the document when moving or backing it up.
Review import notices for images that could not be downloaded.
Save and recover
Look for the save status before quitting or changing documents. Press ⌘ S to save pending edits immediately. If saving fails, keep the window open and resolve the reported problem, such as an unavailable folder. Autosave is not a versioned backup service.
Keep the document’s folder and its hidden .writer folder
together when backing up or moving a project. Canvas state, managed
references and local media depend on that supporting data. Copying only the
article file may omit those materials.
Find commands
Press ⌘ K to open the command palette. Search for a command or a document. It also provides Word import/export and writing preferences.
Write without distractions
Choose Write or press ⌘ 1. The canvas disappears and the document becomes the focus. Move the pointer to the top edge to reveal the toolbar when it is hidden.
Use the command palette to toggle typewriter scrolling, which keeps the active writing area in view, or focus dimming, which reduces emphasis on surrounding text.
Spelling
Writer enables macOS spell checking in the editor. Misspelled words can receive a red underline. Right-click a marked word and choose a suggested correction. Suggestions depend on the system’s language and spelling settings.
Move or remove a paragraph or section
- Move over the block and use its handle to select it.
- Drag the handle to the desired position in the document, following the insertion indicator.
- Release to move the selected block.
With a whole block selected through its handle, Delete or Backspace removes that block. Use ⌘ Z to undo. Clicking into text resumes ordinary text editing.
Use Augmented mode
Choose Augmented or press ⌘ 2. The editor and canvas appear side by side. A frame is an independent place to explore a rewrite, an image or a different presentation of your material.
Start from your document
- Select a section or paragraph using its handle in the editor. The arrow toward the canvas activates only while a section is selected; clicking outside, moving the caret or pressing Escape clears that selection.
- Use the rail arrow pointing toward the canvas to send it across. With a maximized frame, the action can target that frame; otherwise follow the new highlighted frame.
- For several sections, use the rail’s section chooser. Select the sections you want, or choose the entire document.
- Click Open chat on the frame, enter your request in its conversation input, and send it. You can also double-click the frame’s header to open chat. Double-clicking a word in its output selects the word.
Sending content across does not itself start an AI request. New frames are highlighted and brought into view so you can see where the content landed.
Start fresh
Click + New frame to create a blank workspace. You can also use the canvas input to begin new work. Give the agent a clear task, audience and desired output.
Review and bring work back
The frame preview shows its current output on the canvas. Choose Open chat to work with its output and conversation together. Read the result, place the cursor where you want it in the editor, and use the rail arrow toward the editor to insert the frame’s latest content. Review what you insert and remove superseded text when needed; inserting a frame is not a promise to replace the original passage automatically.
Send just part of a frame
- Place the cursor at the destination in your article.
- Select the text or supported items you want in the frame’s latest output, either in its canvas preview or in the open chat’s Output pane.
- When Selection ready appears, use the middle rail’s arrow toward the editor. Its label changes to Send selected frame content to editor.
- To send the entire frame instead, choose Use whole frame before using the arrow. Undo an insertion with ⌘ Z.
Supported formatting travels with the selection. The selection is temporary; select it again after changing frames, viewing history or receiving new output. Website section frames use their separate whole-section replacement workflow.
Keep the output and conversation in view
Open chat keeps Output and Conversation visible together: side by side when there is room, or stacked in a narrow pane. Drag their divider to resize them. You can also focus the divider and adjust it with the arrow keys. Each pane scrolls independently.
Use the frame selector to switch between conversations when you have more than one frame. Choose Back to canvas or press Escape to return to the overview. Writer remembers the unsent reply, divider position and reading positions for each frame. While you read older messages, a new reply does not pull you away; choose New response ↓ to jump to it.
Compare and restore earlier output
- Use Output version, or a conversation’s View version link, to inspect an earlier result.
- Choose Compare to view that result alongside the latest output.
- Choose Restore to make it the new latest version while preserving the earlier history, or Back to latest to continue without restoring it.
Earlier versions are read-only. Return to the latest output or restore a version before sending a new request or transferring content to the editor. Frame output history is separate from Undo in your main document.
Work on several frames at once
Start a request in one frame, then submit a different task in another. Frames can work in parallel. Each captures its own model and reference selection when the request starts. Use a frame’s stop control to cancel its active request.
Processing updates appear inside the frame conversation. Expand or minimize those updates to see more or less of the activity without creating a separate panel.
Arrange your canvas
- Rename: click a frame’s title and edit its name.
- Move: drag a frame by its header.
- Open chat: use the labelled control or double-click the header to work on the output and conversation together.
- Delete: use the trash icon on the frame. Deleting a frame is separate from removing content already inserted into the editor.
- Zoom: use the plus and minus controls to change scale. Double-click empty canvas to fit the current arrangement. At 100%, a large collection can extend beyond the visible area; pan to explore it.
- Arrange and fit: use the square overview control to place visible frames in a non-overlapping arrangement and bring them into view. This changes their positions; Writer saves the arrangement with the document.
- Swap sides: use the swap icon at the top of the middle rail. Writer remembers which side holds the canvas.
- Resize: drag the divider; double-click it to restore equal widths.
The canvas starts at 100% zoom on app startup and for a new document. Fitting all frames may use a smaller scale.
Work on website pages
Use the page design, editor and canvas to improve a website while keeping changes local. Website Editor is off by default. Open Settings and turn on Website Editor, then choose Website beside Write and Augmented. The setting persists across restarts. Turning it off saves the active draft first and keeps your pages and connection.
Open or create a page
Choose New page to start with an editable blank page, enter a public URL and choose Import page, or choose Import HTML. The page selector opens saved pages. In Website mode, the New and Open icons, ⌘ N and ⌘ O open this page chooser without switching to Writer. An invalid address shows an error beside the input; correct it and try again.
Opening and importing show progress until the page is ready to use. Imports automatically save supported styles, fonts and images. Saved pages reuse these assets and attempt to repair missing resources once when opened. If resources are still missing, open Page actions → Page information → Retry page assets. Page information also lists unsupported resources.
Choose Open from Robynn for connected pages and saved cloud audits; see Open pages and audits from Robynn. Local page creation and HTML import work without a Robynn account.
Edit and preview
Pages open in Design. Click a mapped heading, paragraph or list item to edit its text in place; Enter finishes the edit. Use View → Text to edit the same draft as a document. Undo or ⌘ Z reverses page changes, including a section replacement. While actively typing, the editor keeps its normal text-undo behavior. Website change history is kept for the current page session, with a bounded number of changes.
The View menu contains Desktop, Tablet and Mobile widths, Actual size, Fit to pane, and the original/draft comparison. Drag the divider to give the editor or canvas more room; only a small strip remains so you can reach the other pane. Preview shows the draft across the workspace, and Back to editing restores the split. Changes save automatically, including text you are still editing in Design. Saved locally confirms completion. ⌘ S can also flush pending changes immediately. A failed save stays visible with a retry action.
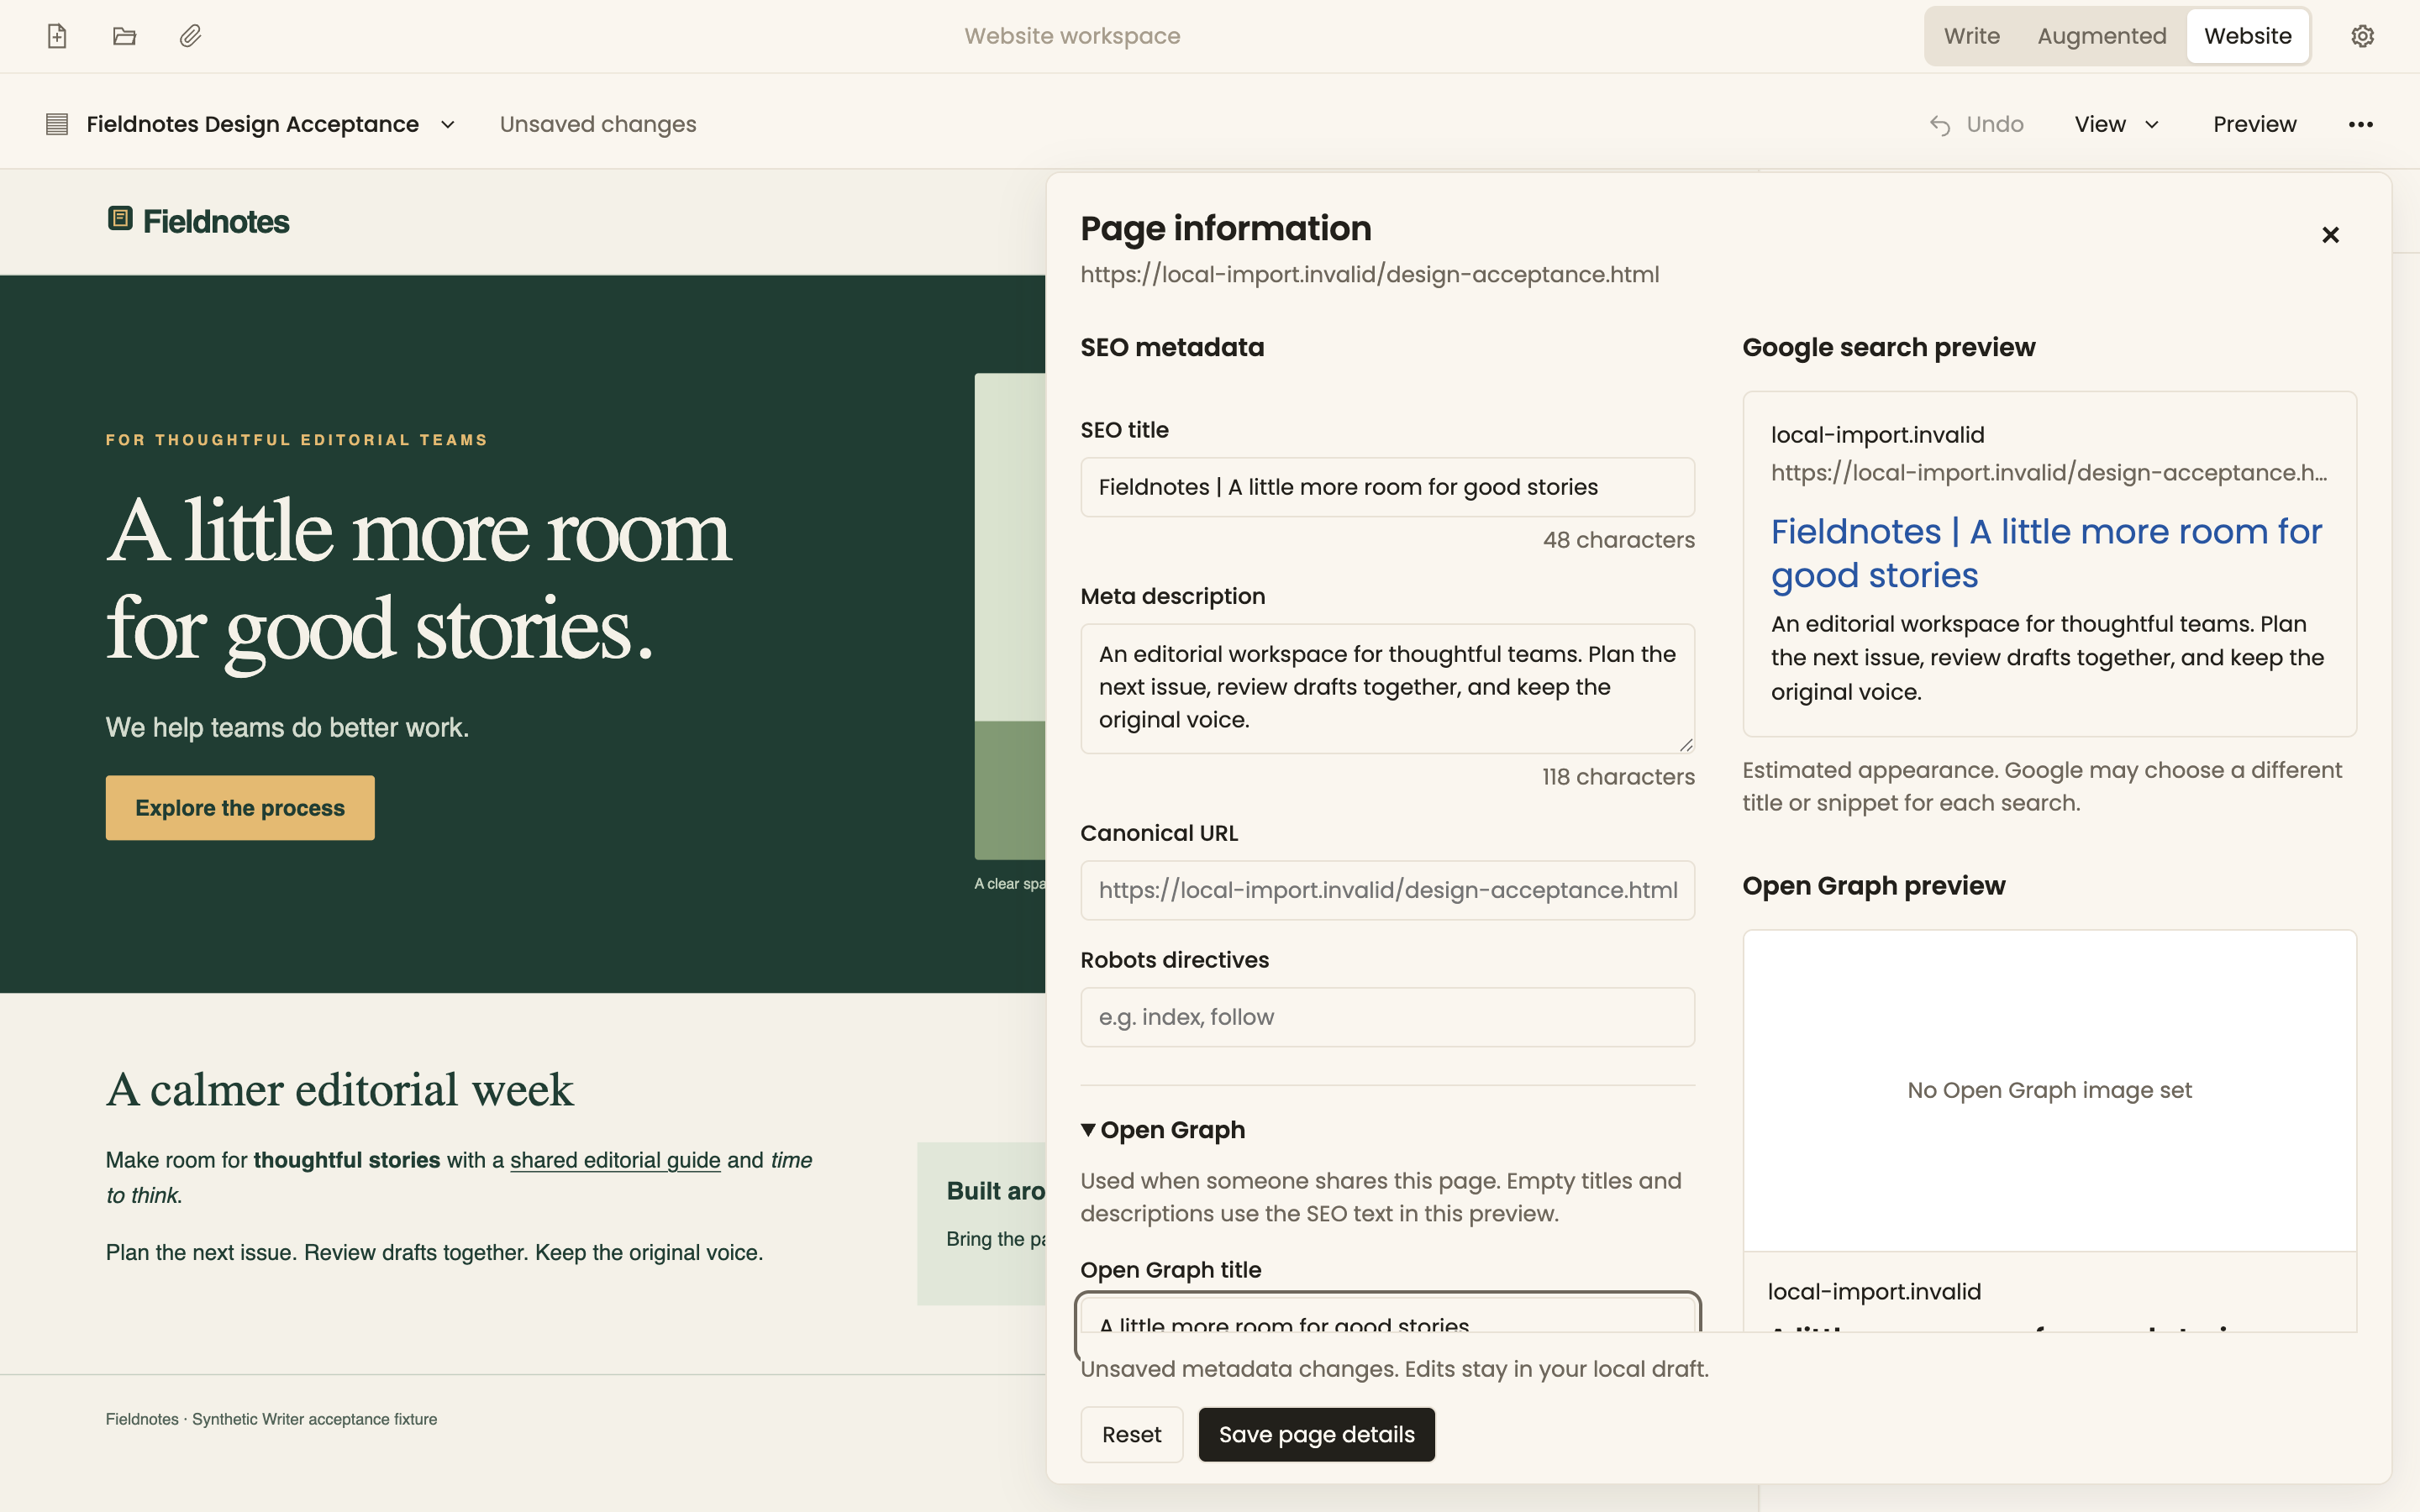
Edit page metadata
- Open the Page actions menu (•••), then choose Page information….
- Set the SEO title, description, canonical URL and robots instructions. Open Open Graph for a sharing title, description, image address, image description, site name, URL, type and locale.
- Use Additional metadata for author and keywords. Check the Google search and Open Graph previews beside the form.
- Choose Save page details and wait for Saved locally. Reset returns unsaved fields to the draft’s saved values.
Metadata changes stay in the local page draft, together with its design and
content. The previews estimate how a search result or shared link may look;
search engines and sharing services can choose different text, crop images
or show an older cached version. An image preview may need internet access
to load its public image address. Setting noindex shows a
reminder that the page asks search engines not to index it.
Review suggested changes
- Open the Review tab, choose Content or SEO / GEO, then choose Find improvements. This uses your configured AI provider. Importing, connecting and choosing references do not start an AI request.
- Review each suggestion, its reason and the current text. Hover over a suggestion to locate its section on the page.
- Preview the change, then apply or dismiss it. Changes to the draft or context can make earlier suggestions stale.
- Wait for Saved locally, then reopen the page from the page selector to continue.
Work on a section in Canvas
- Open Canvas and choose Select section. Click a div or section in the page; use Select parent when you need a larger section.
- Use the middle rail's send arrow to create a frame. The frame shows the section's visual preview with its saved page styles.
- Ask the agent to change that section, such as revising its layout or adding an image. Review the original and modified previews.
- Select the changed frame and use the return arrow to replace the original section. If the page changed in the meantime, select the section again to avoid replacing newer work.
New pages start with an empty canvas. Review analysis stays in the Review tab. Canvas reuses prepared section previews when you return to it; progress remains visible until a section is ready. Each page keeps its own draft, frames and references. Frame output is applied only when you choose to send it back.
Open pages and audits from Robynn
This connected library needs a compatible Robynn service and access to a workspace and website. An authorization page in your browser is only one step: return to Writer and wait for Connected and the website selector.
- Open the page selector, choose Open from Robynn, then connect or choose your website.
- In Pages, search by title or URL. Select one or several pages and choose Download selected. Use More pages when available.
- Watch each page’s download result. Choose Open downloaded to work locally; retry only pages marked as failed. Pages marked Fetch from website retrieve their public URL when you choose to open or download them. Other unavailable pages show their reason.
- Choose Cloud audit to read the website’s saved report, scores, findings and reported pages. Search findings or select one to inspect its recommendation and evidence. Refresh report fetches the saved report; it does not start another audit.
Downloaded pages keep separate local drafts, canvases and references. Loading a website or its report does not start an AI request. When brand context is available for a connected page, expand Brand context, load it and select the references to save with that page. Only that selection is included in the page analysis.
Keep control of the source
Opening the same remote revision returns to its local draft. If the source changes, Writer offers the existing draft or a new snapshot. Disconnect removes native connection credentials from Keychain; saved pages and selected references remain local. Remote revocation failures are reported separately.
Prepare articles for publishing
The Publish control beside an open document’s title starts a reviewed article workflow with Robynn. It is available from Write and Augmented; you do not need to enable Website Editor.
Prepare and review a preview
- Open the article, choose Publish, then Continue with Robynn to use a saved connection or sign in. Complete the browser flow and return to Writer. If the panel asks for additional permissions, choose Enable publishing.
- Choose the connected Website. Set the article title, author, template, URL name, excerpt, categories and tags offered by that website.
- Choose Prepare preview. This saves the current article and sends that article and its included images to the selected Robynn workspace. Reference-file collections, unrelated documents and frame conversations are not part of the publication package.
- Inspect the private website preview at desktop and mobile widths. Read any notes about how the article fits the template.
- Choose a reviewer and Send for review. The assigned reviewer can approve that revision or request changes when their permissions allow it.
- After approval, choose Publish article to send the approved revision to the live website. Review and publication are separate actions.
When the local article has newer edits, use Prepare updated preview. The revised content needs its own review before publication. Autosave does not upload or publish the article.
Opening the Publish panel alone does not read your saved connection or contact Robynn. Continue with Robynn starts that step. Older connections with website access offer Enable publishing to request article permissions in the browser. Expired or revoked access offers Sign in again. Check the workspace shown in the connection screen; use Switch account or workspace when needed. A missing website setup message means a publishing destination still needs to be configured in Robynn. Use Refresh access after your administrator updates the workspace. Connecting does not upload or publish the article.
Read the publication result
WordPress accepted this change means the destination accepted the write. Published and verified means the subsequent verification completed. If verification fails, the change may already be live: use Check status or Recover publication before trying another publication. If the website changed after your preview, review its newer revision before preparing another change.
Images sent to WordPress may become publicly accessible before the post is published. Inspect the included images and destination before proceeding.
Follow up or recover
When offered by your workspace, Check this article again in seven days asks Robynn to check the page and available measurements even while Writer is closed. It does not edit or republish the article. Prepare previous version and Prepare unpublish, when available, create a separate revision for fresh review and approval.
For company writing, the optional Company article workflow in Document context can make the selected website’s knowledge, article inventory and saved audit available to the agent. You still choose the content, reviewer and publication action.
Manage context and reference files
Writer distinguishes the article you are writing from supporting files and the work in each frame.
| Scope | Use it for | Available to |
|---|---|---|
| Current article | The latest full document and its subject | New requests for that document |
| Document context | Research, an editorial brief, background notes | Every frame in the document |
| Frame attachments | A reference image or notes for one specific task | That frame only |
| Current frame | The working output you are revising | Requests in that frame |
Add shared document context
- Click the paperclip immediately after the Open folder icon in the upper-left toolbar.
- Drop several files into the Document context panel, or use its file selector.
- Wait for each file’s reading status. Click a filename to preview its image or extracted text.
- Choose Done, press Escape, or click outside to close the panel. The paperclip count remains visible when the toolbar is shown.
Every frame uses all document references by default, including files added later. Open the frame’s source selector to choose a saved subset. A different document has its own context. The files and their assignments survive app restart. The paperclip also works for the active page in Website mode.
Writer currently attaches individual files. It does not link or continuously index an entire folder. Attach the files you want shared by the document, then use a frame’s source selector when only a subset belongs in that task.
Choose company context for this document
Company knowledge appears below Reference files. Connect to a Robynn organization before enabling Company’s Robynn Growth Cortex. This lets the agent search the organization’s available company knowledge for new requests. The option is specific to this document; local reference files remain available without it.
For a company article, choose a website and enable Company article workflow when your workspace supports it. This adds access to the selected website’s company knowledge, article inventory and saved audit under your organization’s provider permissions. Turning on context does not run the agent or publish the article. If saved company context becomes unavailable after disconnecting, use its remove control to continue with local sources.
Company knowledge and the article workflow require the matching Robynn cloud services. A saved selection alone does not prove that the remote source is available; follow the connection and request status.
Add a reference to just one frame
Use the paperclip in that frame’s input area. Attach the reference there rather than in Document context when it should apply only to that task.
Continue the same conversation
Each frame keeps its conversation across messages, document edits and app restarts. Earlier decisions remain part of the thread while new requests receive the latest article and frame. Progress appears while the provider restores or summarizes a long conversation. Changing providers restores saved chat into a new provider session; earlier tool results remain in the previous provider’s log.
Each sent message includes a source receipt showing the files, versions and extraction status prepared for that request. This records available context, not proof that every passage was read.
Formats and limits
Supported files: PNG, JPEG, GIF, WebP, PDF, DOCX, TXT, MD, CSV and JSON. Each context accepts up to 12 files, 10 MB per file. Text previews show up to 8,000 characters. Scanned or textless documents may not yield usable extracted text; follow the reported status instead of assuming they were fully read.
Replace, remove and troubleshoot
Remove a reference with its remove control and attach a newer copy when needed. Writer keeps managed copies, so changing the original elsewhere does not automatically refresh the attachment. The original file is never changed by removal. Use Retry for a reported loading or extraction failure. Sending waits for extraction to finish. A failed or unreadable source must be retried, removed, or explicitly excluded before sending; your unsent message stays in the input. XLSX workbooks need to be exported to a supported format first.
Removal is held while an affected request is running. New attachments apply to subsequent requests. Each new request captures the current reference list along with the latest article and frame. Bounded excerpts are provided, and the agent can read more through reference tools; attaching a large file does not mean every word is placed into every prompt.
Connect AI providers
Open the gear icon or press ⌘ , to configure agent providers in the right-side Settings drawer. Your document remains visible. Press Escape, click outside, or click the gear again to close it.
| Provider | Connection options in Writer |
|---|---|
| OpenAI | ChatGPT account through bundled Codex, or an OpenAI API key |
| Anthropic | Claude account through bundled Claude Code, or an Anthropic API key |
| Google Gemini | Google API key, or the separate Gemini Code Assist account route through bundled Gemini CLI |
Sign in with an account
- Choose Sign in with account on a supported provider card.
- Complete the browser sign-in flow shown by the provider.
- Return to Writer and check that the card reports a connected account.
- Choose an available default model.
Writer’s account connections are kept separately from terminal sessions for Codex, Claude and Gemini. Signing out in Writer does not sign out those terminal sessions.
Use the Google account option
Google Gemini has separate Code Assist account and API key sections. Writer’s current account setup is intended for eligible Gemini Code Assist organization accounts. Check Google’s current authentication guidance for your account type and use the route available to your account; a Google subscription alone is not confirmation that it works in this Writer build.
- In the Code Assist account section, choose Sign in with Google. If your organization requires a project, open Cloud project (optional) and enter the project ID it provides.
- Finish sign-in in the browser and return to Writer. Saved sign-in means the connection is stored on this Mac; access is checked when you use it.
- Writer loads the account’s models when sign-in completes. Select an available default. If the list is missing when you return to Settings, choose Load models or Refresh. Use Retry models if loading fails.
Changing the Cloud project requires reconnecting. Account and API-key profiles stay separate, so existing API-key frames retain their route. Account availability and quota are determined by Google. This account route does not generate images.
Connect an API key
- Choose Use API key.
- Enter the key only into the provider’s key field, then save it.
- Check the connection result and choose a model.
On the OpenAI and Anthropic cards, saving a key switches new prompts to that key while retaining the saved account connection; check the active route before sending. Google keeps its account and API-key profiles separate. Do not put keys in documents, reference files, skills or chat prompts. API-key usage and subscription-account usage are different connection routes. Consult your provider account for eligibility, billing and usage limits.
Choose a model per frame
Click the model name in a frame’s input area. Choose from the connected providers and their available models. Writer saves the choice with that frame, so two frames can use different models. The canvas input also lets you select a model for new work.
A frame’s choice does not change the default in Settings. The picker is disabled while that frame runs. If a saved model or connection is no longer available, choose another; Writer reports the problem rather than silently substitute a provider.
Generate and use images
- Open or create the frame where you want the visual.
- Attach a reference image if it helps, and describe the subject, purpose and desired composition.
- Ask for generation. For example: “Create a landscape editorial illustration for the current article about secure data handling. Avoid embedded text.”
- Review the resulting image in the frame before bringing the output into the editor.
Writer supports image generation through a connected ChatGPT/Codex account or an OpenAI API key. Check the OpenAI settings card for the active image-generation route. Account generation uses Codex usage limits; the API route uses its key. Successful sign-in alone does not establish that a particular request is within your provider’s current limits.
If generation fails, inspect the error, verify the OpenAI connection and selected model, and retry after resolving the reported issue. A text-provider connection alone does not guarantee an image-generation connection.
Format your document
Use structure to make the article easy to scan. Writer supports headings, paragraphs, lists, links, tables, blockquotes, code, images and supported cards. It is a writing environment, not a full page-layout application.
Format selected text
Select text, right-click it, and choose Heading 1 through Heading 4 or Body from Format as. The choice changes the selected paragraphs’ structure. Use ⌘ Z to undo it. Right-clicking at a caret without a text selection retains the native menu, including spelling suggestions.
While typing
-
At the start of a paragraph, type
#followed by a space for a heading. Use two through four hashes for smaller heading levels. -
Type
-,+or*followed by a space to start a bullet list. - Inside a list, Enter starts another item. Tab indents and Shift–Tab outdents where supported.
- Use Tab to move between table cells when you are not editing a nested list.
- Use Undo if an automatic formatting change was unintended.
Ask for a different presentation
Send the relevant passage to a frame and request a supported structure:
“Convert these comparisons into a table with columns for approach, benefit and limitation. Do not add facts.”
“Turn the main takeaway into a concise card, then keep the explanation below it.”
“Break this long section into three descriptive subheadings and shorter paragraphs.”
Review both wording and structure before inserting the result. Arbitrary frontend components, JavaScript and unrestricted HTML/CSS are not guaranteed to render. A design skill can guide the agent toward supported formats; it cannot expand the editor’s rendering capabilities by itself.
Import and export Word documents
Import a Word document
- Choose File → Import Word Document, use Open Document, or find the import command with ⌘ K.
- Select a
.docxfile. - Writer creates an editable Markdown copy in the current folder and preserves the original source separately.
- Review the imported content and any simplification notice before editing.
Export to Word
- Open the article you want to export.
- Choose File → Export as Word Document, or search for the export command in the palette.
- Choose a filename and destination in the Save dialog.
- Open the exported file in Word and review it before sharing.
Export saves current edits first. It creates an explicit Word copy; subsequent autosaves continue updating Writer’s document, not that exported copy. Export again when you want a newer Word version.
| Supported in the Word workflow | Not preserved as a full round trip |
|---|---|
| Paragraphs, headings, bold/italic, links, nested lists, basic tables, blockquotes, code, raster images and text captions | Page layout, headers/footers, comments, tracked-change history and arbitrary HTML/CSS |
| Cards become shaded, bordered paragraphs; supported images are embedded | Live canvas conversations, attached reference collections and interactive components |
Legacy .doc files are unsupported. Word archives are limited to
32 MB. Remote images are not automatically downloaded during export;
unsupported images can produce a notice or placeholder. This release uses
one export style rather than selectable Word design presets.
Use writing skills and extensions
Skills: reusable writing guidance
A skill is a Markdown file containing instructions, such as an editorial style or document-design approach.
- Open Settings and find Skills & Extensions.
- Open the skills folder:
~/.writer/addons/skills/. -
Drop in a Markdown file, or a folder containing
SKILL.md. - Refresh the list to check for diagnostics. Restart Writer if needed, then ask a frame to use the skill by name.
Edits to valid skill files are read for new requests. Removing a file removes its instructions from subsequent prompts. Skills apply across documents, so use document context for material intended only for one article.
---
name: Clear editorial style
description: Make explanatory writing easier to read.
---
Preserve the facts in the current article.
Prefer short paragraphs and descriptive headings.
Define unfamiliar terms. Do not invent quotations.
Each skill must be UTF-8 and no larger than 32 KiB. Writer loads up to 32 skills within a 128 KiB total instruction budget. Supporting files beside SKILL.md are not automatically loaded or executed.
Extensions: additional agent tools
Copy a compatible extension’s complete package folder into
~/.writer/addons/extensions/, then quit and restart Writer. A
package includes manifest.json and a JavaScript entry file.
Refreshing the list checks discovery; restart ensures agent processes load
the installed version.
Compatible extensions do not require rebuilding Writer. To remove one, remove its folder and restart. Extensions execute local code with your user account’s filesystem and network access, so install only code you trust. Writer does not install their dependencies for you.
For authors, see the companion extension contract and skill format documentation in this documentation folder.
Keyboard shortcuts
| Action | Shortcut |
|---|---|
| New document | ⌘ N |
| Open document | ⌘ O |
| Command palette | ⌘ K |
| Write mode | ⌘ 1 |
| Augmented mode | ⌘ 2 |
| Settings | ⌘ , |
| Save pending document or Website edits | ⌘ S |
| Undo / redo | ⌘ Z / ⇧ ⌘ Z |
| Transfer between editor and canvas | ⌥ ← or ⌥ →, following the destination’s side |
| Delete a block selected by its handle | Delete or Backspace |
| Indent / outdent a list item | Tab / ⇧ Tab |
Hover over rail controls to see the shortcut for the current panel arrangement. Swapping sides changes the direction of transfer. Keyboard behavior can depend on which editor, input or dialog currently has focus.
Troubleshooting and good habits
The agent used the wrong subject
Check the current frame as well as the article: an old frame may still contain a different working draft. Start a new frame or explicitly say which current material to revise. Check document and frame attachments for outdated sources. New requests use the latest article and frame; they do not automatically rewrite old frame content to match a changed article.
A reference appears unreadable
Open Document context or the frame’s attachment list, inspect its status, and use Retry. Check format and size limits. A scanned PDF may have no extractable text; provide a text version when necessary.
References could not be loaded
Open the frame’s chat and choose Retry loading. Keep your unsent message while the document and frame sources reload. If the error persists, reopen the document and check its Document context and frame attachments. Resolve any failed source by retrying it, removing it, or excluding it from that frame before sending. The agent cannot use a reference that Writer has not successfully prepared.
The file changed on disk
This message means Writer found a different saved version while you had unsaved edits. It pauses saving so you can choose which version to keep. Copy any text you want to preserve before choosing: Reload uses the version on disk; Keep mine saves your current edits over it. Choosing a different folder for a new file should not itself cause a conflict. If the message repeats without an external change, check for another open copy of Writer or another editor using that file and report the issue.
Keychain access after updating
A signed app can still need permission to read connection details saved by an older development or unsigned build. Signing identifies Writer; it does not automatically grant access to those existing Keychain items. This is separate from the macOS downloaded-app confirmation.
If the prompt identifies Writer from your Applications folder and the Robynn connection you intend to use, enter your login Keychain password in the macOS dialog and choose Always Allow to remember access. Allow permits that request only, so another prompt can follow. Never put that password in Writer chat or a document. See Apple’s explanation of Keychain access.
If prompts continue after Always Allow while using the same signed copy, contact support with the app version and the item name shown. Do not delete your entire Keychain. A repeated prompt needs investigation; it does not by itself mean notarization failed.
A model is unavailable or sign-in stopped working
Check the provider in Settings. Retry the model list or select an available model in the affected frame. Reconnect when the error requests authentication. Do not repeatedly resubmit a request that reports a persistent account or limit problem.
I cannot see all my frames
Use Arrange and fit frames, the square overview control, to arrange visible frames without overlap and bring them into view. To keep their current positions, double-click an empty part of the canvas to fit the view. Then zoom in and pan to the area you want.
Website is missing from the toolbar
Open Settings and turn on Website Editor. Write and Augmented remain the default workspaces. Disabling Website Editor keeps saved pages, so enabling it again restores access to them.
The Google browser sign-in finished but models are missing
Return to Settings and check the Code Assist account section. A saved sign-in and an available model list are separate steps. Writer attempts model loading after sign-in. Choose Load models or Refresh if needed, then read any eligibility, project or connection error. Use Reconnect Google if authentication needs to be renewed. A browser success page alone does not confirm usable model access. An API-key model list belongs to the separate Google API-key connection.
Publishing is unavailable for my website
Read the availability message in Publish article. Choose Enable publishing for an older connection that needs article permissions, or Sign in again for expired or revoked access. Check the displayed workspace and use Switch account or workspace if needed. Missing website setup requires a Robynn publishing destination, a WordPress target with the required bridge and a supported theme. Your administrator can check those requirements. Continue writing locally or export a Word copy while they are resolved.
My Word document looks different
Writer simplifies page-layout features. Keep the original for exact layout or revision history. Review exported tables, images and captions in Word before sharing; make final page-layout adjustments there if needed.
The file picker will not open a document
Cancel the dialog and try again. If the chooser remains stuck, make sure your article is saved, restart Writer, and reopen it. A transient macOS picker issue has been observed in the Word workflow.
Before sharing a finished piece
- Check facts, quotations and the source of important claims.
- Confirm only the intended frame outputs were inserted.
- Review image placement, captions, links and tables.
- Check save status and make a backup of the project folder.
- Open the exported Word copy and inspect it.
Online AI requests send relevant prompts and context to the selected provider. Local storage does not make those requests offline. Share only material you intend that provider to process.